Articles by "ArcGIS"
Showing posts with label ArcGIS. Show all posts
data base of maps for Administrative map, regional map, local map, provincial map, urban map, rural map, physical map, hydrography, hydrographic

أرك جي أي اس، هو برنامج متخصص في نظم المعلومات الجغرافية، تم تطويره كمنصة لتحليل المعلومات الجغرافية وتخزينها، وكذلك منصة لرسم الخرائط واستخراجها، يمكن أن تشمل مجالات تخصص برنامج ArcGIS الاتي:
  • انشاء واستعمال الخرائط.
  • تجميع البيانات الجغرافية.
  • التحليل المعلوماتي للخرائط.
  • مشاركة واستكشاف المعلومات الجغرافية.
  • استعمال واضافة الخرائط والمعلومات الجغرافية في مجموعة من البرامج
  • تدبير المعلومات الجغرافية في قواعد البيانات.
في هذا المقال سوف أشرح لك المكونات الأساسية لبرنامج ArcMAP، دعونا نبدأ من خلال فتح مشروع جديد أو قائم في ArcMap

الخطوة 1: لفتح مشروع جديد،

انقر على 'خرائط الجديد'
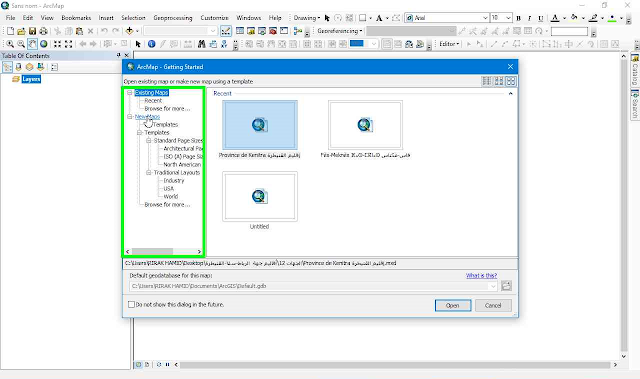
click on new maps


 وحدد خريطة فارغة


 ثم موافق

ينقسم ArcMap إلى قسمين قسم "جدول المحتويات" حيث ستقع طبقات البيانات الخاصة بك. قسم ثاني "طريقة عرض البيانات" و هو المكان الذي سيتم عرضه التمثيل المرئي للبيانات الخاصة بك.
1 - قسم على اليسار هو "جدول المحتويات" المؤطر باللون الأخضر حيث ستقع طبقات البيانات الخاصة بك.
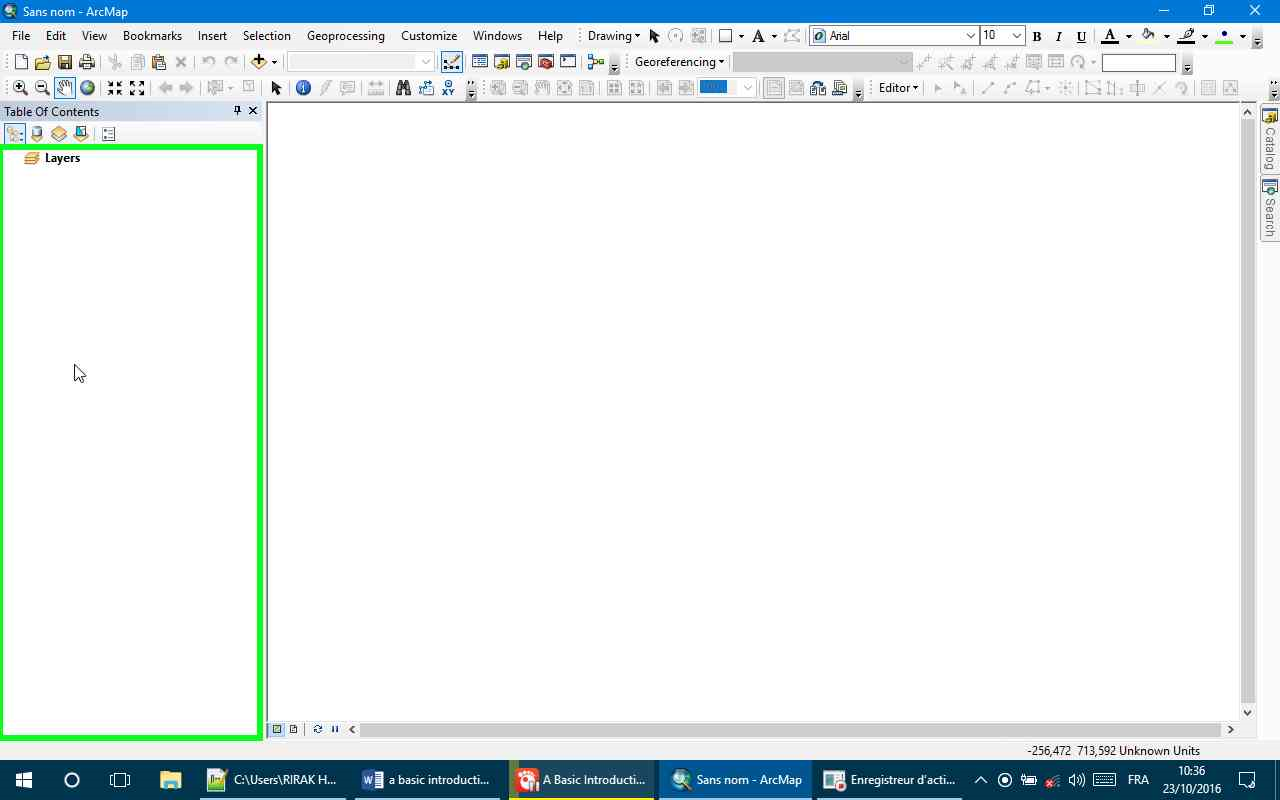
2-قسم على اليمين هو "طريقة عرض البيانات". هذا هو المكان الذي سيتم عرضه التمثيل المرئي للبيانات الخاصة بك. (الخرائط)

الخطوة 2: تعيين البيانات

لتعيين البيانات الخاصة بك، انقر على 'File'،

ثم اضغط على ‘Add data’، واختر مرة أخرى ‘Add data’ كما هو موضح في الصورة أسفله

أو، يمكنك النقر على "إضافة بيانات - Add data" في شريط الأدوات القياسي.

انتقل إلى موقع ملفات البيانات الخاصة بك في جهازك، اختر منها ما يهمك وانقر فوق إضافة - Add .

ثم مباشرة سوف تظهر ملفات البيانات المحددة في جدول المحتويات،

يمكنك اختيار عرض الطبقات الخاصة بك في عرض البيانات عن طريق تحديد أو إلغاء تحديدها في جدول المحتويات.
يمكنك أيضا ترتيب طبقات البيانات في التسلسل الهرمي عن طريق النقر والسحب أحد الطبقات الى أعلى أو أسفل من آخر.

الخطوة 3: شريط الادوات


شريط الأدوات يحتوي على مجموعة متنوعة من الأدوات المفيدة والضرورية في الخلق خريطة المعيار وأدوات المتواجدة في شريط الأدوات هي الأكثر فائدة لأغراض رسم الخرائط بصفة عامة لهذا لا يمكن حذفها والاستغناء عنه. يمكنك تحديد وظيفة أداة من تحوم الماوس الخاص بك فوقها

يمكنك إضافة وإزالة أشرطة الأدوات عن طريق النقر على 'تخصيص' customize ، ثم اختر "أشرطة الأدوات toolbars " ثم اختيار أداة من الفائدة.

يمكنك أيضا إضافة أشرطة الأدوات بالنقر بزر الماوس الأيمن على رأس النافذة 

الخطوة 3: الحفظ


عندما تنتهي من تعديل وانت راضيا على المشروع الخاص بك، يمكنك حفظه. يرجى ملاحظة أنك تقوم بحفظ فقط اسم الدليل حيث تقع البيانات وليس البيانات نفسها. والمشروع هو مجرد عنصر نائب تظهر فيه البيانات الخاص بك. 
لحفظ، انقر فوق File، وحفظ باسم أي Save As ،

وانتقل إلى الموقع الذي تريد الحفظ به، واكتب اسما لمشروعك وانقر فوق "حفظSave ".
ثم يتم حفظ المشروع في شكل برنامج ArcMap 10.

يمكنك أيضا حفظ المشروع الخاص بك كنسخة قديمة من ArcMap بالنقر على "File"، ثم بالضغط على Save A Copy…،


واختيار نسخة من ArcMap التي ترغب في حفظها.


 نفس الشرح أقدمه لك بواسطة الفيديو

يمكنك تحميل هذا الشرح على شكل كتاب pdf لترجع له مرة أخرة من زر Download في الاسفل مباشرة

Download Demo

data base of maps for Administrative map, regional map, local map, provincial map, urban map, rural map, physical map, hydrography, hydrographic

ArcGIS is a software specialised of geographic information system (GIS), is made for working with geographic information and maps.And also It's used for many fields such as: 
  1. creating and using maps.
  2. compiling geographic data. 
  3. analysing mapped information. 
  4. sharing and discovering geographic information. 
  5. using maps and geographic information in a range of applications.
  6. and managing geographic information in a database.
in this article I'll explain to you the basic Ingredients of ArcMap software, let's begin by opening a new or existing project in ArcMap.

Step 1 : click on new maps

click on new maps


And select blank map then ok


Then ok


ArcMap is divided into two sections, the section of contents where your data layers will be located, and the section of date of you, that where the visual representation of your data will be displayed.

The section one on the left with the green border is a table of contents where your data layers will be located


The section two on the right is the date of you, more clarity this section is where the visual representation of your data will be displayed.

Step 2: Adding data to ArcMap

Adding data to map, your data we need to first add it to the project click on File, (element of menu)

And click add data and add data such as in the pic below:

Or you can click on the add data icon located in the standard toolbar

Browse the location of your data files

Select them and click add the selected

Data files now appear in the table of contents and are visually displayed in the data view

You can choose to display your layers in the data view by checking or unchecking them in the table of contents

You can also arrange the data layers of hierarchy by clicking and dragging one on top or below of another

Step 3: tool bars 


Tool bars a two of our hosts a variety of tools that are useful in that creation the standard and tools toolbar are the most useful for general mapping purposes:


You can determine the function of a tool by hovering your mouse over an icon and reading the description located on the bottom left hand corner of the arc map window.

Moreover, you can add and remove toolbars by clicking on customize toolbars and then selecting the tool that you interest or you need.


Step 4: saving

Once you are satisfied with your project you can save it, please note that your only saving the pathnames to where your data is located, and not the data itself a project is merely a placeholder showing where your, data is located and not actually containing the data itself.

to save click on file save as

Browse to the location you would like to save provide a name to your project and click save, this saves the project in an ArcMap 10 format

If you want to save your project as an older version of arc map by clicking file save as copy

And, selecting the version of arc map that you wish to save

To downloading the pdf file about this tutorial